Showing posts with label diorama. Show all posts

Wednesday, August 9, 2017

Workbench Wednesday

Having a couple days off from work, and picking up a few models at my parents place last night I still found time with the sunny weather to do some inside work this afternoon.  Living in an apartment has its challenges for modelling, but with a small piece of plywood, I can have a small mobile workbench of sorts thats easy to keep clean, and also keeps my wife happy content.
Apartment workbench.
I had picked up a Proto 2000 SD60M a few years back that didn't run well at all, but I got it used for a very good price, so I decided to hang onto it and see what I could do with it down the road...  Fast forward to a few days ago and I got thinking about the SD60M again, and figured it was time to try to get it working. My initial plan when I bought it was to use the chassis for a Kaslo SD60F shell in the future.

The previous owner had cemented the shell onto the chassis on one end which resulted in much frustration as I tried to pry the shell off.  By the time I had the couplers unscrewed and off, I was able to pull most of the shell off...with the plow details etc still cemented on nice and tight to the front of the chassis.  I noticed the fly wheels were stuck and rotated them a few times with my fingers, stuck the engine on my test track and after a couple hiccups she really purred.

Back up to my workbench I approached the daunting task of figuring out how to effectively remove the plow and steps.
With a lack of patience comes great frustration (or something like that). Upon attacking the plow, I absolutely destroyed it which I could care less about as I wanted a somewhat clean chassis for my future Kaslo shell.  It took some serious beating at with a screwdriver and an awl and finally my rail nips to get the cursed thing off, but alas, she's ready for a new shell!
Ready for a new shell.
That pile you see in front of the SD60M?  Thats the remains of the plow, steps, and other details that are now all in the garbage.  Alas, I was able to save the MU hoses, and some handrails off the front of the unit.
Detail debris.
You may have noticed my SD40 shell in pieces in the background on my "workbench".  Stay tuned for updates in the near future on that, as it is progressing along slowly but quite well.
SD40 project progress.
Two posts in one week...wow!

- Caleb

Monday, August 7, 2017

Operating on the WC Kimberley Sub

While in Winnipeg for my training with CN, it seemed only fitting that I visit a few local layouts if  time allowed.  Bill Brillinger extended an invitation to me to join himself and a few other locals in operating on Bob Menzies' home layout.  I delightfully accepted this offer, and Bill kindly offered to pick me up at the Best Western on the day of.

Saturday, April 22, 2017 was the day that worked best for everyone involved, and Bill picked me up at the hotel relatively early to allow us a good chunk of time to operate.

We arrived at Bob's around mid-morning and in short order I found myself in Bob's basement which isn't all that big, however Bob has wisely used all permissible space for his layout.  Currently Bob has a "plywood pacific" of sorts, but fully operational.

The day unfolded with three of us running trains, Bob overseeing everything, including giving guidance with regards to switching out various industries, and finally Ian Lisakowski performing duties as Neenah Yardmaster.  My train wasn't quite put together in Neenah Yard, so I snapped a quick photo of what would be my power for the day, as the trio rolled off the shop track.
SOO 415 (RS27), GBW 319 (C424), AC 1501 (GP7)
It wasn't long after I had taken a few photos that Ian had my train made up and all ready to go.  Bob runs a double shelf style layout, with the yard on top tucked away just behind the stairway, and a slow  descending grade to the bottom level.  I can't exactly recall, but my train was somewhere in the range of 35-45 cars long and with a couple short blasts on the horn, train FLO 97 began the descent down to switch out the various industries at International Papers and Thilmany Packaging.

The photo below shows the peninsula along with the short spur off to the right where a couple more customers are located, which I had to pull and spot cars at each customer.  It was quite the challenge, but having no one else in my way due to my location, I managed to get the work done as efficiently as an amateur operator can do ;)
Pickups for FLO 97 at International Paper.
At some point in the early afternoon Bob and his wife, Margaret offered me a Vernor's Ginger Ale, a specialty from Michigan if Im not mistaken.  I personally do not care much for pop anymore, but this stuff was incredible.  Needless to say, at the end of the day I had happily polished off a total of 4 cans.  I made sure to not take long breaks from switching and only sporadic sips though, as work had to be done!

Throughout the day, Bob came around snipping trip pins on MANY couplers, and even did some changing out of awful wheel sets and replaced them with beautiful IMRC wheel sets.  This helped improve the operations success by a huge margin.

My only real flaw was getting hung up on a couple of switches in and around the peninsula industries while operating FLO 97.  A few of the switches had Bob's specialty kitty litter ballast caught up in the points which resulted in multiple derailments, but with a little bit of patience all was well.  Just as I was drawing to a close on switching International Paper, a supper call was made by Margaret.

The weary crew, busy from working on various jobs all day, hurried excitedly upstairs to find a most impressive roast beef dinner awaiting us.  Lots of laughs and stories alike shared around the table with a beautiful banana cream pie to devour for dessert.  To say we as a crew were spoiled is an understatement.

With supper behind us, there were a few more hours left to operate before we would shut everything down for the evening.  I wasn't too long finishing up my work on FLO 97 and had the train back up in Neenah Yard.  Ian explained that he had a FLO 93 train built up also for the lower deck of the layout, and I coupled onto that and was off.
Pickups for FLO 93 at IMCO Pulp & M&I Drilling.
Very soon after, it all became very congested as Bill had FLO 91 and Ricoh had FLO 95 all working down in the same vicinity.  However, it provided real life scenarios with congestion in very close proximity with a lot of work to be done.

Sometime after supper, Margaret reappeared downstairs with a tray full of fresh chocolate chip cookies.  Of course this warranted a need to have another ginger ale with a few cookies!
FLO 93 preparing to head downgrade.
Needless to say, I got as much done as I could, and the night was drawing to a close all too quick.  I figured it would be better to get half of the work done and return to the yard, as opposed to getting 3/4 or so of the work done and leaving the power and all the cars down at the industries.

I will end this post with a shot of my train just moments after leaving the yard with train FLO 93, before I headed downgrade.
A huge thanks goes out to Bill for inviting me, and also to Bob and Margaret for being such welcoming hosts and providing a fun day of operating with some incredible food!

Last but not least a couple photos graciously supplied by Bill of some of us operating throughout the day, and an operating selfie! :)
Myself, Bob, and Ian (Pictured left to right): Bill Brillinger Photo 
Bill & Ricoh (Pictured left to right): Bill Brillinger  Photo
- Caleb

Monday, July 17, 2017

Three Months Later, an Update!

It has been over three months since my last blogpost...wow.

Life has been busy, and in case you (my readers), didn't know, I am now an employee for CN Rail, as of the end of March.

Between a new career, training in Winnipeg for a total of seven weeks, and moving from Lunenburg to the Halifax area, it has all been fairly hectic.  However, I still find time here and there to do what I enjoy as a model railroader.  So here's whats been happening or hasn't been happening in the model department :-)

The UMG module will be taking a break for a little while as wiring and soldering the module itself is the next stage.  My plans is to use that module as a diorama of sorts to take photos of my models on as they are completed, and also to use at local model railroad shows as time off allows me to attend.

I have purchased a few pieces of rolling stock and also an older SD40 Athearn blue box locomotive, which should be arriving in the mail any day now!

My personal modules will wait until my wife and I move into a house sometime in the future where I can plan something more permanent for my layout.  I have had multiple modellers suggest that I focus on weathering and detailing rolling stock and motive power until I have the space for a layout, and I have decided to do just that.

Back in late February, I spent an evening with local modeller Ryan Handrahan and with his careful guiding, I was able to successfully weather my first piece of rolling stock, a CNA Railbox boxcar.  I have included a photo below to show the lightly weathered results.  In fact this week, I will be back at Ryan's for a second take on weathering with pan pastels and oil paints!
First boxcar, weathered.
Well there you have it, the next post will be a brief synopsis of two operating sessions I was apart of during my stay in Winnipeg.  As always, thank you for taking the time to view my blog, and I hope to have lots more material for you all in the near future!

- Caleb

Saturday, March 25, 2017

GTW SD40-3: Part One

Well I figure its time for another blog post, as its been a couple weeks since the last one.  This will be the first official update on my SD40 project.  Before I get into it, I have to admit, not very much has been done since I acquired the unit at the Truro show last fall.

The SD40 has been bathing in alcohol since November at my parent's house, and to be honest, aside from a couple visits of taking a toothbrush to it, nothing else has been done.  However, in the past few days, with the help of other modellers, I have begun doing research on what detail parts I will need in order to turn the soon to be undecorated SD40 into a GTW SD40-3.

Below, I have included some photos of the unit before and after.  Aside from that, theres not much to say...

The former SD40 shell fully painted (not by me).
The majority of the paint stripped off of the SD40.
The next post regarding the SD40 will hopefully show the entirety of the paint stripped off of it, with some detail parts added.

- Caleb

Monday, March 6, 2017

UMG Module: Part One

Its been just shy of two months since my last blog post...its time for a new one!

I have not given up my plans of building a layout, rather where I am unsure of exactly what I want to model, I figured I'd do the next best thing and get to work on a module for the UMG, (a local group made up of members from the maritime provinces and Quebec).

I was unsure of what to build and floated various ideas around in my head before finally coming up with what I wanted to model.  There is no rules which state that a member HAS to model an area 100% prototypically, as freelancing is allowed.  However, I wanted the challenge to model prototypically and decided upon the Suburban Propane facility located in Milford, New Hampshire which is no longer serviced by rail.

I have included a photo below of the general area which I will be modelling.  Clearly, the red/maroon line shows where the current tracks lie.


For those that don't know, this is classified as the Hillsboro Branch, currently owned by Pan Am Railways to Wilton, NH, and state owned from Wilton to Bennington.  The Milford-Bennington shortline runs on this trackage from the quarry in South Lyndeborough to Granite State Concrete, located approximately a mile to the right, or railway east of the above photo.  The Milford-Bennington Railway runs from late spring to early fall making two to three rounds trips each day.  Pan Am has only one customer this far up the line, Hendrix Wire, which receives plastic pellet hoppers once a week.  It should also be noted that track speed at best on the branch is 5-10 MPH, with some locations that have restrictions of 3 MPH.

Suburban Propane last received cars in 2006, and did not receive them all that long before then.  So here this spur sits empty now, having not seen any traffic since 2006...a whopping eleven years, but in the future,  they may receive cars again, no one knows for sure...

With the history of Suburban Propane, and a short snippet of the Hillsboro Branch, I will now include an early photo of what the module looked like having just received cork.


Since this photo was taken, there have been quite a few additions...which will be mentioned in another blog post, stay tuned!

Caleb

Monday, January 16, 2017

A Visit to Andrew Castle's Home Layout

On Monday, January 10, 2017, after many failed attempts, I finally was able to spend a few hours at Andrew Castle's house to take in his excellent models on his layout that is developing quite nicely!

Believe it or not, I did not take many photos, but rather took some notes the old school way with a paper and notepad!  For those of you that don't know, Andrew is an excellent modeller, and has just a couple locomotives on his roster that are factory painted.  The first photo that you can see below is of two excellent custom paint jobs featuring CN 4762, (GP38-2W) & CN 9410, (GP40-2W).

Custom painted CN 4762 in HO Scale.
Custom painted CN 9410 in HO Scale.

Andrew models a few different prototypical scenes, including Onslow to Brookfield, NS on the CN Bedford & Springhill Subdivisions, along with the Truro A-Yard and a portion of the CBNS Hopewell Subdivision.  Although not much scenery is done, the models that Andrew has taken the time to build, reconfigure, strip paint off of, repaint, etc look extremely sharp!  The scene below hosts covered hoppers that in time will be a recreation of CIL Fertilizer, more commonly known as Truro Agromart today, located in Onslow, NS.

Covered hoppers on the CIL Fertilizer spur.

Although the Truro-Yard does not usually host much if any road power, this yard currently hosts a smorgasbord of power, as these are currently "dead", waiting decoder replacements.  Andrew is in the process of changing over the decoders in his locomotives from Tsunami to LokSound.

CN Truro A-Yard, with locomotives awaiting new decoders.
CN 3541 sits next to the former yard office in Truro, NS.

The pride and joy of Andrew's Layout is his scene depicting Sproule Lumber located in Valley, NS, and served by the CBNS Railroad.  The entire scene below is either scratchbuilt or kit bashed pieces.  I was very impressed to see this in person, as there is just the right amount of detail to make this scene come to life!

Sproule Lumber located in Valley, NS.

Although we didn't run any trains, I was perfectly content to soak in all of the information that I could learn about priming and painting models with various methods.  Of course, being able to look at this layout as a whole was much appreciated too!  Thanks again to Andrew Castle for having me over and letting me see his work up close and personal, and again for being such a wealth of knowledge to me!  I cannot wait to return and hopefully operate on this well-built layout someday.

- Caleb

Wednesday, November 30, 2016

Changes are Comin'

It has been just over two weeks since my last post, but I have good reason for missing the weekly posts as I was in the United States with my wife for American Thanksgiving.

This post will be short, sweet, and to the point. :)

I have decided to rip up the current track on my module and replace it with Micro-Engineering Code 83, as opposed to the Atlas Code 83 which is what I originally planned on using.  The reason for this is simple.  It has been recommended to me by multiple modellers to use ME as opposed to Atlas as it is more realistic track, and the switches snap world's better than Atlas ones.  It was also recommended that I could just use PECO switches with Atlas flex, however I like uniformity, so ME it is. :)

With that being said, stay tuned for updates as I remove the current track, and lay down Micro-Engineering.  I have Atlas flex for sale, (obviously not full 3 foot sections), and a couple switches too.  If you're interested in purchasing my track, comment below!

One final view of the module with Atlas Code 83 on the module.  This is the track that is for sale.
Oh yes, to our friends south of the border, I hope your Thanksgiving's were full of food and time with family, plus Black Friday deals ;)

- Caleb

Monday, November 14, 2016

Shur-Gain Module: The Vision

To keep up with this one blogpost a week deal, I figured I'd do a short write-up on my one module that I currently have track laid down on.  For those that don't know, this module is meant to represent the spur that once went into Shur-Gain located in Sussex, New Brunswick.

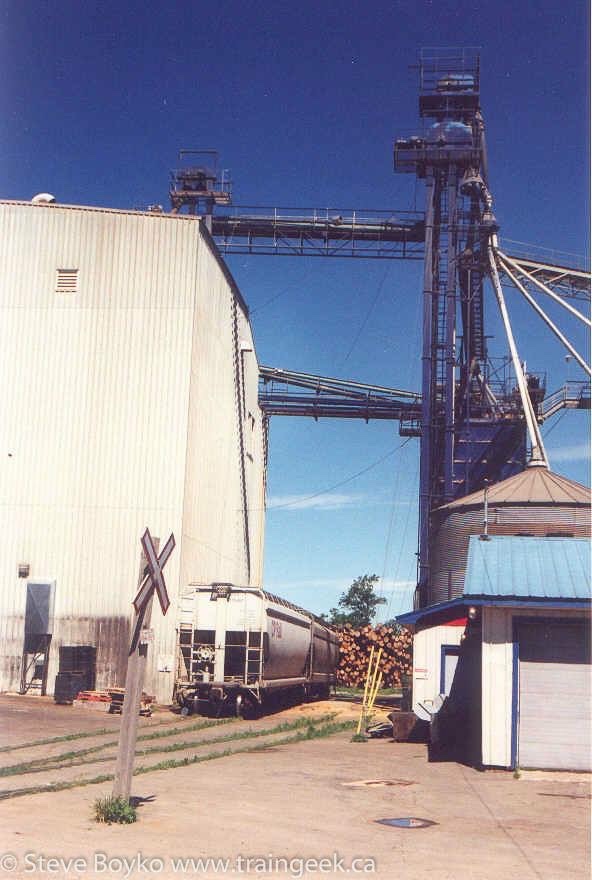
Although I've shared photos of the bare bones module before, I figured I'd share some prototype photos so any who would like to see what the module will hopefully become someday, can see what it once was.  Keep in mind, that this spur is now removed, and the Shur-Gain is now just a simple little store, as the distribution centre has been moved to Moncton.

The following photos below belong to Steve Boyko.  Thanks Steve for the permission to post these!
Shur-Gain Prototype -1 
Shur-Gain Prototype - 2 
Shur-Gain Prototype - 3

Onto a few more photos that I have in my collection, this time from Tim Dryden.
Shur-Gain Prototype - 4 
Shur-Gain Prototype - 5
Thank you to both gents for the permission to use these photos that I can model from.

As for myself, back in the early 2000's I had an old film camera that I remember capturing photos of light power on this spur...I lost the film and I have no idea where the photos went :(

Also, here is an aerial photo of where the spur once was, and the current mainline on the Sussex Subdivision through the namesake town.  The spur is located in the left portion branching somewhat northwest in the aerial photo.
Sussex East, with the Shur-Gain Spur & Weyerhaeuser.
So that's that, now maybe you can get an idea of where I'm coming from with my Shur-Gain module.  Just in case you don't get it, here you go, maybe this can help you envision it.  The plan will be to build the majority of the Shur-Gain facility on another smaller module that will butt onto this current one.
Shur-Gain Prototype & Bare Bones Module.
That about wraps it up!  Hoping to paint a small section of test track this coming week, which will merit another blogpost next Monday!

- Caleb

Monday, November 7, 2016

First Time Kit Construction

Having done some previous boxcar kits before, but never seriously, I decided it was time to do a real kit project, and do it the "right way".  I bought this kit a few years ago at Maritime Hobbies & Crafts for a mere $10.00, and figured it was time to stop moving the box around with all the parts in it without assembling it.

Well to be blunt, I understood why the price was listed at what it was.  As I began to piece the tank halves together...well I got quite frustrated but was determined to get through it.  The halves were slightly warped, enough so that it took more than just CA to cement the two together.  After multiple attempts, my wonderful wife suggested I use elastics, as she must've sensed I was getting close to taking a hammer to the darned thing, and it worked well!
My wife's brilliant idea of using elastics to hold the tanker halves together.
The rest of the assembly was not too difficult, and the two photos below show the almost car on my module.  All that is missing in these photos is the stirrups...
The tanker assembled minus the stirrups.
The CN SD70i coupled up to the RAIX tanker, again, complete minus the stirrups.
I saved the stirrups for last, as mentioned above, and I know why.  What an absolute royal pain in the butt.  Needless to say, the car has three of the four stirrups on now.  I say three and not four, because yesterday as I took one last peek at it before storing it away...one of the stirrups snapped off.  Before it goes into service, she needs a heavy dose of weathering along the top, and the final stirrup added.

Overall I enjoyed this kit, and like always, learned lots!

On another side note, this is my second post within the past seven days, possibly a positive sign of things to come!

- Caleb

Friday, April 22, 2016

A Visit to Patrick Gagnon's Home Layout/Diorama

Well, so much for the thought of a weekly blogpost...but for now it is remaining regularly once per month, baby steps!

I contacted Patrick Gagnon, an excellent modeller, awhile back about paying him a visit and seeing some of his models along with his small, yet impressive layout in person.  He kindly obliged, and I made the trek to Saint-Leonard, NB yesterday.  Of course, as a railfan I had to check the west-facing home signal at Saint-Leonard immediately after crossing the border, which showed a very clear indication of no westbound trains for awhile.  So it was time to follow Patrick to his house, and see the layout and the models that awaited my camera!

Upon arrival at Patrick's, he and I walked downstairs into his basement and as soon as he opened the door to his layout room, I seriously didn't know where to look first.  Everywhere I turned there was either a finished, gorgeous looking product, or a project in the works.  This was the first scene that I saw as I entered the most impressive room.

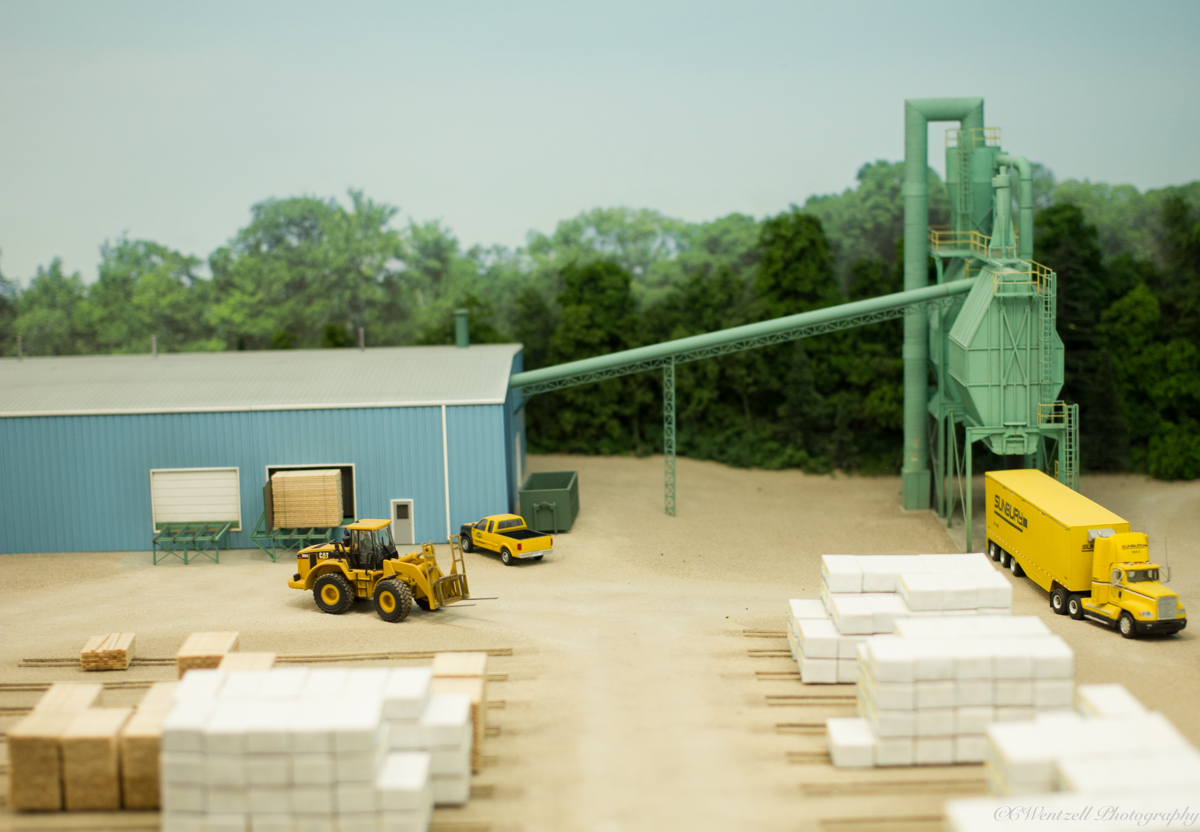
Impressive workbench featuring Saint-Leonard Irving sawmill in behind.
I am being completely serious when I say that it took me a solid 10-15 minutes to just look everything over right in this spot.  I was truly impressed as I just looked everything over with drool ready to just drop right out of my mouth...okay so maybe not, but you get the idea!

Any type of pre 90's North American diesel locomotive and chances are, he has either 1) started and completed a kit/kitbash of the model, 2) is in the process of building the model, or 3) plans on getting the proper detailed parts to complete the kit at some point.  Let me just say that this guy knows how to model, and model well!  The assortment of half-completed, fully completed, no where near completed projects lay all over the workbench, each one was impressive in its own super detailed way.

After getting my eyes back in my head, it was time to clean the rails a bit and run some stuff!  As Patrick's layout is arranged as a diorama, there isn't much running to do, but for the little that is available, it has very good scenery.  The first order of business was to bring one of his GP40-2W's out and so after playing with the QSI sound functions, I snapped a couple photos.  I will share a few photos below here to show just how detailed a portion of his fleet is.  I say a portion because I could've spent a full week there photographing each individual model.  The portion where I mainly staged the trains for the photos is in a portion of what Patrick is portraying as modern day Longley on the CN Napadogan Subdivision, located in northwestern New Brunswick.
CN 9637 coupled up to another GP40-2W, staged at CN Longley with a scratchbuilt SGE signal.

With the shoot of the GP40 wide cabs out of the way, I brought out something from the yard that piqued my interest a little bit more, CN 4105, a GP9, and parked it right on the crossing for its 'photoshoot'.
CN 4105, a GP9 idles at the crossing with an impatient driver of a Midland truck on the other side.
There were a variety of more units I 'played' with, I'll share these photos below.
CN 2000 backing down from the crossing.
VIA LRC in run mode awaits a clear signal at CN Longley, with a MOW crew preparing to relay track.
CN 1124, a GMD-1, custom painted blares the horn as the lone unit approaches the busy crossing.
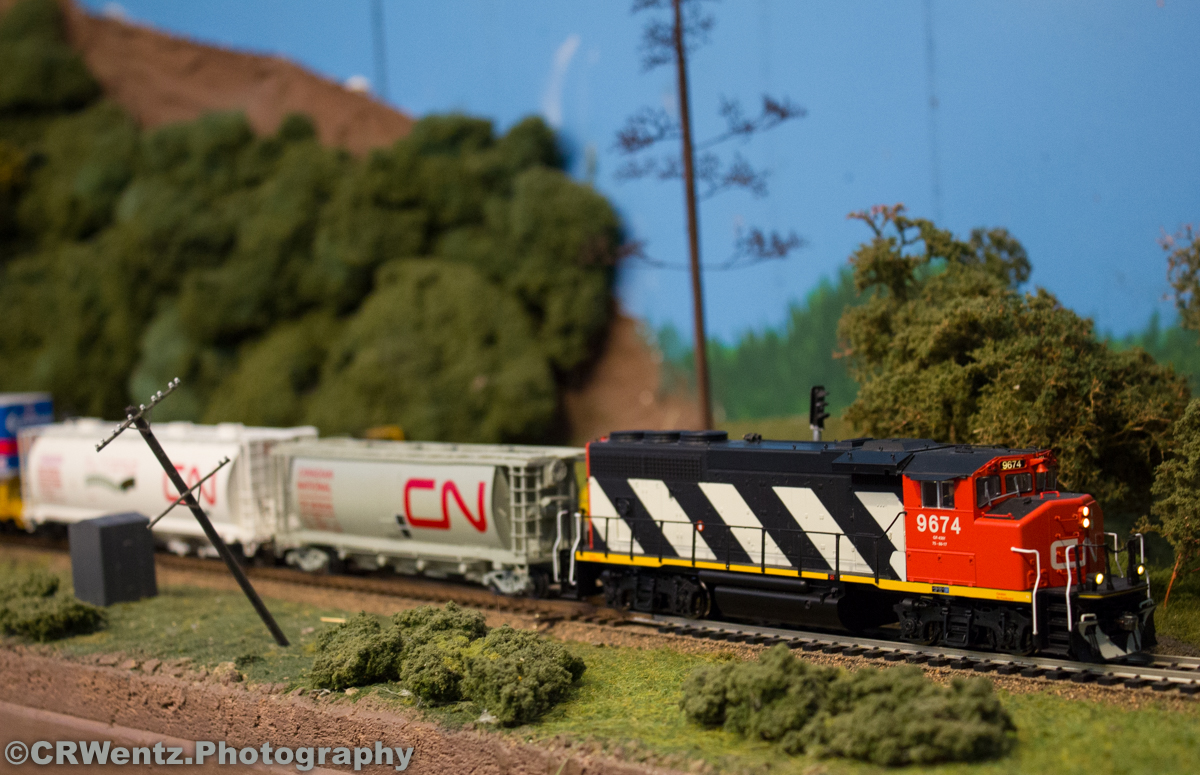
CN 9674 has a train in tow as the light engine movements are done for the moment, allowing a 'real train' to get rolling!
I'll take a few minutes now and discuss how Patrick's yard is set up.  He says that he originally planned to model a small BAR yard, such as Northern Maine Junction, (NMJ), located in Hermon, Maine. However, now he says it could be a representation of either NMJ or Edmundston, New Brunswick.  Regardless, I figured rather than just explaining it, I should document it, so I will have more ideas for my future yard someday, and so you all can see for yourselves! :)
NMJ or Edmundston?
You may notice that there are a collection of cabeese in back...one being a new-to-Patrick, Overland Models kit.  There really is not much else to say about the yard, other than the fact that he says he may add a couple more tracks in time to accommodate better switching.  Also, his 'siding' at Longley will be his yard lead in time.  I was beginning to get short on time at this point, as I had previous commitments, so I wrapped up the day with a couple shots of some 'rare' visitors to Canada ;)
Sister's BAR 85 & 86 sit dead after going into emergency, having just left the Saint-Leonard mill.
MMA 8592 comes to the rescue to pull the two BAR units out of the woods, and return to American soil.
And that about wrapped up the tour of Patrick Gagnon's small but impressive layout/diorama with some truly epic models!

After leaving Patrick's, I took the old highway on the way back to Grand Falls and intercepted CN 305, a manifest train, just west of Grand Falls.  Since I really was strapped for time, I observed it as I met it awhile driving and did a quick mental inventory of the power...of course I jotted it down when I got a chance :)

Hope you enjoyed reading about Patrick's layout, and if you are ever in the area, I am sure he would be open to more visitors.  Thanks again Patrick!

- Caleb