Wednesday, November 30, 2016

Changes are Comin'

It has been just over two weeks since my last post, but I have good reason for missing the weekly posts as I was in the United States with my wife for American Thanksgiving.

This post will be short, sweet, and to the point. :)

I have decided to rip up the current track on my module and replace it with Micro-Engineering Code 83, as opposed to the Atlas Code 83 which is what I originally planned on using.  The reason for this is simple.  It has been recommended to me by multiple modellers to use ME as opposed to Atlas as it is more realistic track, and the switches snap world's better than Atlas ones.  It was also recommended that I could just use PECO switches with Atlas flex, however I like uniformity, so ME it is. :)

With that being said, stay tuned for updates as I remove the current track, and lay down Micro-Engineering.  I have Atlas flex for sale, (obviously not full 3 foot sections), and a couple switches too.  If you're interested in purchasing my track, comment below!

One final view of the module with Atlas Code 83 on the module.  This is the track that is for sale.
Oh yes, to our friends south of the border, I hope your Thanksgiving's were full of food and time with family, plus Black Friday deals ;)

- Caleb

Monday, November 14, 2016

Shur-Gain Module: The Vision

To keep up with this one blogpost a week deal, I figured I'd do a short write-up on my one module that I currently have track laid down on.  For those that don't know, this module is meant to represent the spur that once went into Shur-Gain located in Sussex, New Brunswick.

Although I've shared photos of the bare bones module before, I figured I'd share some prototype photos so any who would like to see what the module will hopefully become someday, can see what it once was.  Keep in mind, that this spur is now removed, and the Shur-Gain is now just a simple little store, as the distribution centre has been moved to Moncton.

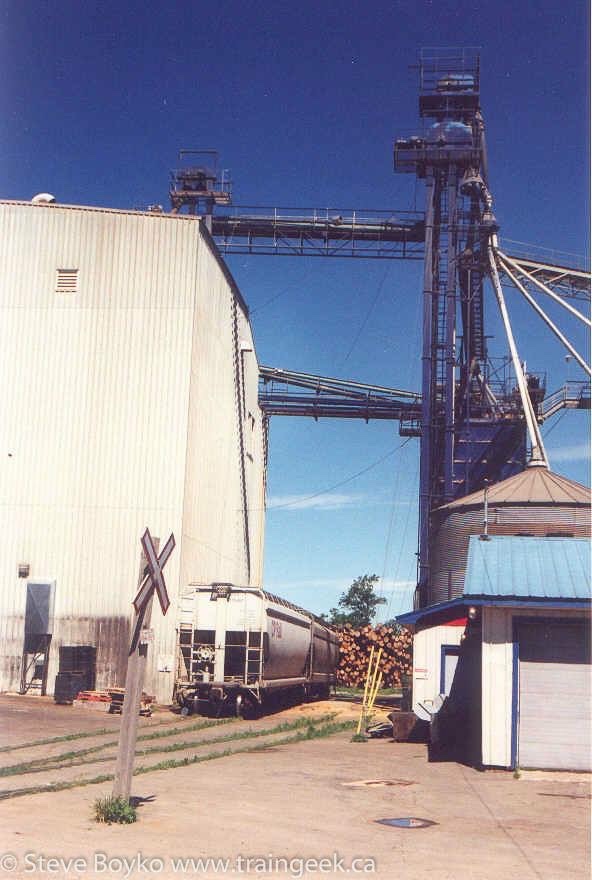
The following photos below belong to Steve Boyko.  Thanks Steve for the permission to post these!
Shur-Gain Prototype -1 
Shur-Gain Prototype - 2 
Shur-Gain Prototype - 3

Onto a few more photos that I have in my collection, this time from Tim Dryden.
Shur-Gain Prototype - 4 
Shur-Gain Prototype - 5
Thank you to both gents for the permission to use these photos that I can model from.

As for myself, back in the early 2000's I had an old film camera that I remember capturing photos of light power on this spur...I lost the film and I have no idea where the photos went :(

Also, here is an aerial photo of where the spur once was, and the current mainline on the Sussex Subdivision through the namesake town.  The spur is located in the left portion branching somewhat northwest in the aerial photo.
Sussex East, with the Shur-Gain Spur & Weyerhaeuser.
So that's that, now maybe you can get an idea of where I'm coming from with my Shur-Gain module.  Just in case you don't get it, here you go, maybe this can help you envision it.  The plan will be to build the majority of the Shur-Gain facility on another smaller module that will butt onto this current one.
Shur-Gain Prototype & Bare Bones Module.
That about wraps it up!  Hoping to paint a small section of test track this coming week, which will merit another blogpost next Monday!

- Caleb

Monday, November 7, 2016

First Time Kit Construction

Having done some previous boxcar kits before, but never seriously, I decided it was time to do a real kit project, and do it the "right way".  I bought this kit a few years ago at Maritime Hobbies & Crafts for a mere $10.00, and figured it was time to stop moving the box around with all the parts in it without assembling it.

Well to be blunt, I understood why the price was listed at what it was.  As I began to piece the tank halves together...well I got quite frustrated but was determined to get through it.  The halves were slightly warped, enough so that it took more than just CA to cement the two together.  After multiple attempts, my wonderful wife suggested I use elastics, as she must've sensed I was getting close to taking a hammer to the darned thing, and it worked well!
My wife's brilliant idea of using elastics to hold the tanker halves together.
The rest of the assembly was not too difficult, and the two photos below show the almost car on my module.  All that is missing in these photos is the stirrups...
The tanker assembled minus the stirrups.
The CN SD70i coupled up to the RAIX tanker, again, complete minus the stirrups.
I saved the stirrups for last, as mentioned above, and I know why.  What an absolute royal pain in the butt.  Needless to say, the car has three of the four stirrups on now.  I say three and not four, because yesterday as I took one last peek at it before storing it away...one of the stirrups snapped off.  Before it goes into service, she needs a heavy dose of weathering along the top, and the final stirrup added.

Overall I enjoyed this kit, and like always, learned lots!

On another side note, this is my second post within the past seven days, possibly a positive sign of things to come!

- Caleb